
5 Helpful Tips for Teaching About Elections + Realistic Ballots to Use in Your Classroom

Updated: Jun 2
The midterm elections won't take place until November 3rd, but primary season is already in full swing.
While most of my posts are ELA and Special Education-centered, I also taught 6th-grade Social Studies for several years. During that time, I struggled to find realistic ballots to help my wonderfully curious students learn about the voting process during election season.
After finding resource after resource that was cute but not age-appropriate for my middle schoolers, who wanted to know what ballots really look like, I finally gave up and just made some for myself!
Today, I'm sharing my realistic ballots with you as well as some helpful tips for your election unit!
The Ballots
The ballots below aren't just for reference; they're meant to be used. That's why all of the text in the 4 included templates is fully editable in Canva. Replace the text with the names of real candidates, get silly with your political party and candidate names, or do both.
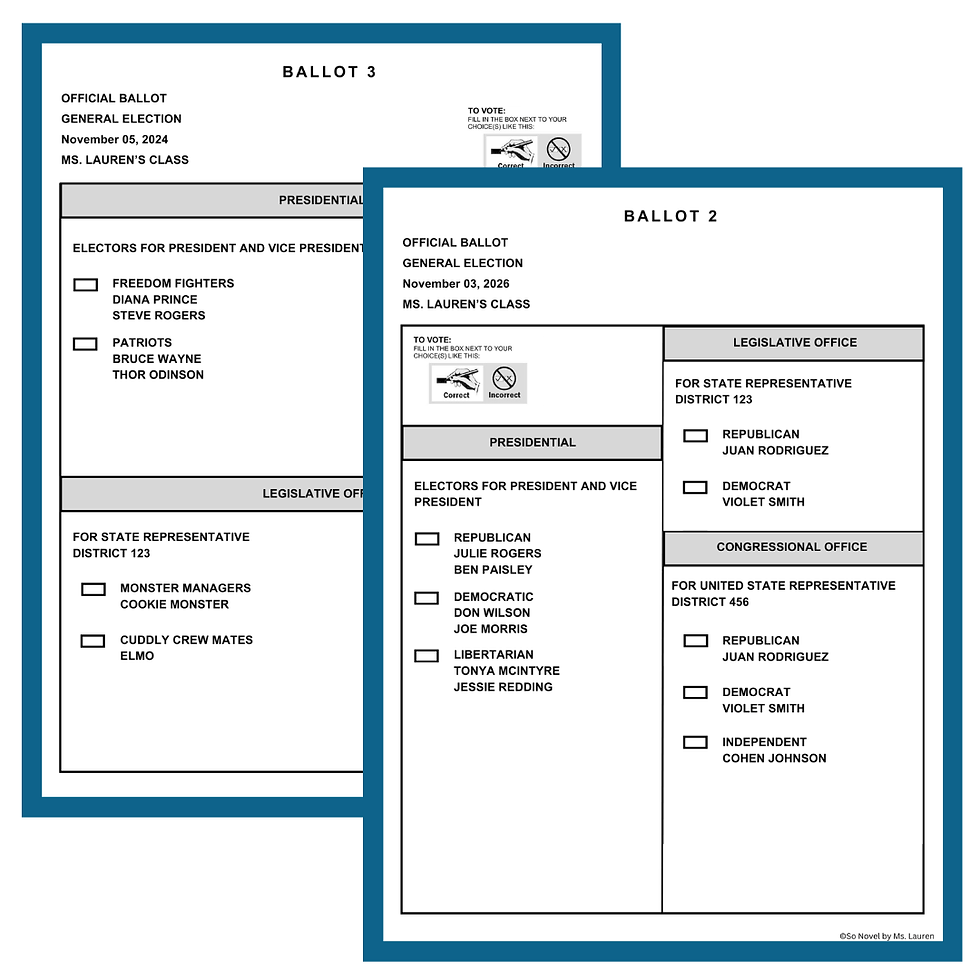
You can snag the ballots for your classroom here.
Helpful Teaching Tips
Middle school and high school students want the real deal. They've been told why voting is important, how candidates run for office, and have learned about the different parties, but they want to know what the actual voting experience is like. So, share what that experience is like!
Tip #1 - Explain that everyone has an assigned polling place based on their home address, and tell your students where your polling place is located. Chances are, it will ring a bell with some of your students, and they will realize that you have the same polling place as their parents, which makes it all much more relatable. (Mine is in a local church.)
Tip #2 - Walk them through the process that you go through when you cast your vote. Tell them about having to wait in line, showing your ID/registration cards, walking into the privacy booth area, submitting your ballot in the machine - all of it! Google pictures of the booths and machines to use as visuals as you explain the process.
Tip #3 - Some students won't know what it means to be "registered to vote." So, show your students your voter registration card (with your private information blocked, of course). You might be surprised how curious students are about the card, how to register, deadlines, etc.
Tip #4 - The following questions are likely to come up. When they do, use visual aids like related photos you've Googled and the ballots above, as often as possible.
"Do I have to vote when I turn 18?" "Can we just vote for president, or do we have to fill in a box for each office?"
"What if I just want to vote for all Republicans or all Democrats?"
"Can I vote for a Republican if I am a Democrat?"
Tip #5 - Let the conversation flow as freely as possible. Welcome questions! Often, our students have lots of unanswered questions that they haven't had the opportunity to ask. So, give them that opportunity. I know they will appreciate that you've taken the time to answer.
I hope you have a wonderful time teaching your students about the voting process. Happy voting!
Until next time,
Lauren


Comments